Working with Iterations

Navigation:  Objects > Iterations and Iterated Images >

Working with Iterations

Previous pageReturn to chapter overviewNext page
Show/Hide Hidden Text

Iterations in Sketchpad are powerful and flexible. Here are some of the ways they can be controlled and displayed.

Set Iteration Depth Manually or Parametrically

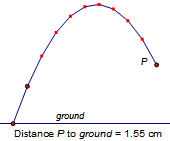
Set Iteration Depth Manually

You can change the depth of an iteration in several ways.

To begin, select one or more iterated image objects.

Press the + or key. Each press of the key increases or decreases the depth of iteration by one.

Choose Increase Iterations or Decrease Iterations from the Context menu.

Choose Edit | Properties | Iteration and type a value for Number of iterations.

No matter which method you use, the minimum depth is one, and the maximum depth is limited by the number of iteration samples that can be displayed.

You can choose Edit | Advanced Preferences | Sampling to change the maximum number of iteration samples allowed.

Set Iteration Depth Parametrically

When you define an iteration, use a measurement, parameter, or calculation in your sketch to automatically determine the depth of the iteration. First select the points or parameters that define the pre-image, and then select the value that defines the iteration depth. (The depth value must be the last object selected.) Hold the Shift key while you pull down the Transform menu, and the Iterate command changes to Iterate to Depth. Choose this command and use the Iterate dialog box to define the iteration normally. Once the iteration is defined, the integer part of the depth value determines the iteration depth.

Note

If the value is negative, the depth is set to zero.

If the value is too large to display all the iterated images, Sketchpad uses the maximum depth at which the images can be displayed.

When an iteration’s depth is determined by the value of a parameter or calculation, you can’t set the depth manually.

Control the Appearance of Iterated Images

You can select, color, style, hide, or clear individual iterated image objects. In this example, you might want to hide or clear the images of the iterated triangle’s vertices, so that only the sides of the triangle are visible in your illustration. Click an image object to select the entire orbit  (iterated image) of the corresponding pre-image object. Any change you make in color, point or line style, or visibility will affect the entire orbit of that pre-image object. The appearance of unselected orbits will not be affected.

You can display the full orbit of all objects in the iteration, or only the final iteration of all objects. This example shows the full orbit. If it showed the final iteration only, all inner triangles except the smallest would be hidden. To control this setting when you create the iteration, choose Full orbit or Final iteration only from the Display pop-up menu of the Iterate dialog box. To change this setting after you’ve created the iteration, use the Iteration Properties panel.

Create or Suppress a Table of Iterated Values

If one or more visible measured values change as a result of an iteration, Sketchpad creates a table of iterated values when you create the iteration. The table contains one column for each visible value affected by the iteration, as well as an initial column — labeled n — that indicates the level of iteration. Each row in the table describes the values of the measurements at the indicated level of iteration.

For example, in a sketch containing a parameter Seed, with an initial value of 100, and a calculation Seed / 2, if you iterate the pre-image parameter Seed to the first image calculation Seed / 2, Sketchpad produces this table, containing the iterated images of Seed / 2 as SeedSeed / 2.

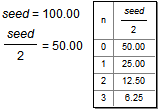
The number of rows in a table of iterated values changes automatically as you increase or decrease the depth of iteration. If you don’t want to create the table of iterated values, uncheck Tabulate Iterated Values in the Structure pop-up menu of the Iterate dialog box. If you create a table when you create the iteration and decide you no longer need it, select the table and clear it from your sketch.

Make Iterated Points on Paths Fixed or Random

Sometimes you may want to specify a point on an object as the first image of an iterated pre-image. For instance, you might map a triangle’s vertices to arbitrary points constructed on its three segment edges. In this case, the Structure pop-up menu of the Iterate dialog box allows you to choose how Sketchpad will iterate these arbitrary points on objects.

To Same Relative Locations: Sketchpad displays each iterated image point at the same relative location as the first image you chose in the Iterate dialog box. If you drag the first image point to a new location on the path on which it’s constructed, all of the iterated images adjust to the same relative new location.

To New Random Locations: Each iterated image of your initial point appears at a new, random location on its iterated path, independent of the location of the first image. This choice is useful if you’re exploring geometric probability or other applications of randomness.

After you’ve constructed an iteration, use its Iteration Properties panel to experiment with both choices for how to iterate points constructed on path objects.

When a selected iteration maps at least one point to a random location, you can randomize the locations either by choosing Edit | Properties | Iteration and clicking the Randomize Now button or by pressing ! (exclamation point) on the keyboard.

Same Relative Locations

New Random Locations

Create the Terminal Point of an Iterated Point Image

On occasion you may want to use the very last point of an iterated point object. You may want to attach a construction to this point or measure some quantity that depends on the point.

You cannot construct a terminal point on an iteration that uses multiple iteration maps.

To construct the terminal point of an iterated point image, select the iterated image of the point and choose Transform | Terminal Point. If the depth of the iteration changes, the terminal point moves accordingly.

When you select an iterated point image, the Iterate command changes to Terminal Point.

In this examples, an iteration was used to construct the flight path of a thrown ball. (The pre-image points, not shown here, defined the initial velocity of the ball and the strength of gravity.) To determine the height of the ball after some number of iterations, the terminal point was constructed and used to measure the distance between the terminal point and the ground.

Use Multiple Iteration Maps to Create Iterated Fractals and Tessellations

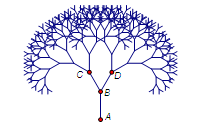
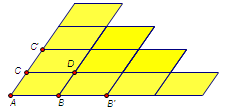
Use multiple iteration maps to make each step of the iteration produce two or more copies of the original objects. Multiple maps allow you to create iterated fractals and tessellations such as the Sierpiński gasket, a binary tree, or a parallelogram tessellation.