A Numeric Iteration |
  
|
| Show/Hide Hidden Text |
A Numeric Iteration |
|
| Show/Hide Hidden Text |
When you create an iteration, it can be a geometric iteration (based on independent points), a numeric iteration (based on parameters), or a combination of the two. Here’s an example of using a numeric iteration to create a Fibonacci sequence.
To define a Sketchpad iteration, create the pre-image and then specify how its defining points or parameters should be mapped to produce the first iteration image. Sketchpad handles the iteration from there.
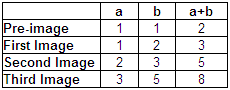
For instance, here are the pre-image and the first three images for a Fibonacci sequence iteration. The first image repeats the pre-image calculation, but instead of a and b uses the values of b and a + b from the previous step. |
|
Here’s the map that shows how to go from one step of the iteration to the next. It indicates that each new image will be created by starting with the values of b and a + b from the previous step. |
a b |
Follow the steps below to construct this iterated Fibonacci sequence.
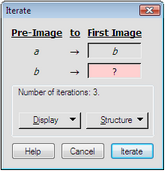
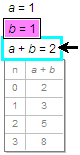
1.Construct the pre-image by creating new parameters a and b. Choose Number | Calculate to compute a + b. 2.Select the parameters a and b that define the pre-image. 3.Choose Transform | Iterate. The Iterate dialog box appears with the left column filled in with the starting parameters from the pre-image. You may need to drag the dialog box out of the way so that you can see your parameters and calculation. |
|
|
4.Click parameter b in the sketch to fill in the top box of the right column. This specifies that parameter b should play the same role in the first image that parameter a played in the pre-image. |
|
|
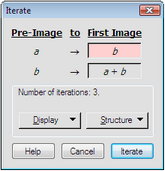
5.Similarly click a + b in the sketch to complete the iteration map. This specifies that the result of a + b should play the same role in the first image that parameter b played in the pre-image. |
|
|
6.After you complete the entire map, click the Iterate button to confirm the iteration rule. Sketchpad shows the result of this iteration as a table containing the results of a + b for each step of the iteration. |
|
|
Sketchpad produces an iterated image object for each object affected by your mapping. In this example the pre-image has only a single object (the calculation a + b) that depends on the parameters, so the result is a single iterated image object: the table showing the value of the calculation.
If the pre-image contained other numeric or geometric objects that depended on the parameters, the iteration would generate an iterated image object for each such object.
Sketchpad normally displays iterations to a depth of three, showing the first, second, and third iteration image. Use Iteration Properties to change the depth of the iteration in order to show more or fewer iteration images, or select any of the iterated image objects (the table in this example) and press + or – on the keyboard.
You can also use a numeric value (a parameter or a calculation) to control the depth of an iteration. After selecting the seed points and/or values, select one additional parameter or calculation, and then hold Shift and choose Transform | Iterate to Depth. (Notice the change in the command name.) The whole number part of the value you selected last will define the number of iterations. (When you choose Iterate, the minimum depth is one; when you choose Iterate to Depth, the minimum depth is zero.) |
Use Iterate to create fractals such as the Sierpiński Gasket by specifying more than one mapping of your pre-image. See Multiple Iteration Maps for more information.
See also: