Make a Custom Tool |
  
|
| Show/Hide Hidden Text |
Make a Custom Tool |
|
| Show/Hide Hidden Text |
You define new custom tools by example: you create a construction you want to turn into a tool, select the objects that make up the construction, and define a tool based on that example. The objects you select must be related to each other in such a way that at least one selected object is completely determined by other selected objects. To define the tool, choose Create New Tool from the Custom Tools menu.
The selected objects produced by a tool are the results of the tool. The selected objects that don’t depend on any others, but upon which the results depend, are the givens of the tool. Any unselected objects that relate the selected givens to the selected results are intermediate objects. (Intermediate objects are not visible when you use the tool; only the objects that were selected when you defined the tool are visible results when you use the tool.)
Follow these steps to make a new custom tool:
1.Make a construction to serve as an example of the construction you want the tool to produce. Use any of Sketchpad’s tools or menus to create this exemplar.
2.Select the given objects (usually, independent points) and the desired resulting objects you’d like the tool to produce. The order in which you select the givens determines the order in which you’ll match givens when using the tool.
3.If there are other objects that relate the givens to the final results, you can select them or not. If you do select them, they will be shown when you use the tool. If you don’t select them, they will still be constructed when you use the tool, but they will be hidden rather than visible.
4.Press and hold the Custom Tool icon. Choose Create New Tool from the Custom Tools menu that appears.
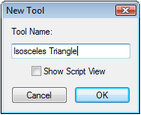
5.A dialog box appears in which you can type a name for the tool. Type a name and click OK. (If the name you type is already used for an existing tool, a dialog box appears allowing you to decide whether to replace the existing tool with the new one.)
Your tool is added to the Custom Tools menu, and is ready to use.
To see the givens and results of the tool, show the Script View.
If a given tool object in the tool should always match the same sketch object, you can make this match occur automatically.
You can store the document containing the tool in the Tool Folder to make it permanently available in the Custom Tools menu.
When you make a tool, any selected objects that depend on the givens become results of the tool, and will be shown when you use the tool. Any unselected objects that depend on the givens will not be shown when you use it. For example, if you make a tool that constructs the perpendicular bisector of a segment, the segment is the given object and the perpendicular bisector is a result. If you select the midpoint of the segment when you make the tool, the midpoint is also a result, and is shown when you use the tool. If you don’t select the midpoint, it’s an intermediate object and is hidden when you use the tool.
|
After you’ve created one or more custom tools in a document, you can rearrange them, copy them to other documents, rename them, or remove them by choosing Tool Options from the Custom Tools menu. This command opens the Document Options dialog box to a view of your document’s tools. You can store your document in the Tool Folder to make the document's tools available every time you use Sketchpad. |
Choose Show Script View or Hide Script View from the Custom Tools menu to show or hide the script view of the active tool. This view allows you to see the given objects and the steps the tool takes to construct its results, change the properties of the steps, and observe and control the tool as it functions. |
See also:
Document Options and Tool Options
How to Make a Perpendicular Bisector Tool


