Givens and Steps of a Tool |
  
|
| Show/Hide Hidden Text |
Givens and Steps of a Tool |
|
| Show/Hide Hidden Text |
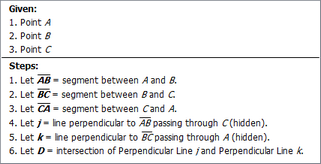
The Script View’s Object List describes, in a step-by-step fashion, all of the objects and constructed relationships that make up the custom tool. The object list is divided into two major sections: Givens and Steps. |
|
The Given section shows all the given objects for the tool — all the objects that don’t depend on any other objects in the tool. When using the tool in a sketch, these are the objects that you “match” in a sketch by clicking the tool. Given objects are listed in the order in which you must match them, which by default is the order chosen by the tool’s author when the tool was created. You can change the order of given objects by dragging individual given objects up or down in Script View. In some tools, the Given section may be divided into two parts, labeled Assuming and Given. The Assuming part contains assumed objects — given objects that are automatically matched to sketch objects having the same label when the tool is used in a sketch. The Given part contains the remaining given objects — the given objects that must be matched explicitly. To change an object to be assumed, double-click the object and check Automatically Match Sketch Object in the Label panel. Assumed objects don’t need to be matched explicitly when you use the tool, unless the sketch does not contain objects to match with the same label. (By default, a tool’s given objects are explicit, as opposed to assumed. But when you use a tool repeatedly in the same sketch, you may find it convenient to change some explicitly given objects into assumed objects.) For more information about assumed objects, see Automatically Match a Given Object. |
The Steps section shows all the objects that will be created from the tool’s given objects. These include the tool’s intermediate objects (which are not displayed when the tool is used in a sketch), and the tool’s final results (which are displayed). Unlike given objects, a tool’s steps cannot be reordered: they are determined by the tool’s construction. The script step for an intermediate object describes it as “hidden.” To change the visibility of a tool object, double-click it and check or uncheck the Hidden checkbox in the Object Properties panel. |
You can double-click any object in the Object List to change its properties. When you double-click, the Properties dialog box appears. Use the various panels to make any desired changes to the properties. You can also use the Parents and Children pop-up menus on the Object panel to view and change the properties of the parents or children of the object. You can right-click (Windows) or Ctrl-click (Macintosh) any object in the list to display a Context menu for the clicked object. Use this Context menu to change the color, point style, line style, or tracing for the object on which you click. The Context menu also allows you to print the script. |
See also: