Use a Custom Tool |
  
|
| Show/Hide Hidden Text |
Use a Custom Tool |
|
| Show/Hide Hidden Text |
Custom tools are easy to use, even before you learn how to make one yourself.
In this example, you'll first set up a Tool Folder in which to store documents that contain custom tools. (When you set up the Tool Folder, it will contain an example document that comes with Sketchpad, but later on you can add your own documents, with your own tools, to this folder.)
After you've set up the Tool Folder, you'll actually use a tool. In this example, you'll use a tool that constructs a square.
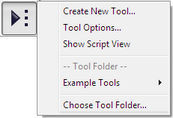
1.Press and hold the Custom tools icon in the Toolbox until the Custom Tools menu appears. From this menu, choose the command Choose Tool Folder.
2.With the dialog box that appears, navigate to a folder in which to store your custom tools. Use an existing folder, or create a new one.
3.Make sure there's a check next to Create Example Tools document in chosen Tool Folder. Then click Choose. A dialog box appears to indicate that the Example Tools document has been created. (If you see an error message, make sure that you have write access to the folder you've chosen.)
Now that you've chosen a Tool Folder, tools in this folder will be available every time you start Sketchpad (until you change or reset the Tool Folder). You don't need to repeat steps 1–3 each time you want to use a tool.
4.Press and hold the Custom tools icon again. This time, from the Custom Tools menu choose Example Tools | Square Given Two Vertices. This custom tool is now your active tool.
5.Click the Square Given Two Vertices tool in two different places in the sketch. A square appears. (Instead of clicking twice, you can press and drag if you like.)
6.Continue using the custom tool to make lots of squares. You can click in empty space, on existing points, on paths, or on intersections just as you can with the Point, Compass, and Straightedge tools.
7.When you’re finished making squares, click any other tool in the Toolbox, or press the Esc key.
To resume making squares, click the Custom tool icon again. You don’t need to press and hold to choose from the Custom Tools menu the next time — just click the Custom tool icon to activate it. Press and hold the Custom tool icon in the Toolbox only when you want to switch to a different custom tool from the menu.

Each time you click as you use a tool, you specify a given object — an object that is used to determine the rest of the objects the tool produces. The objects produced by the tool (that depend on the given objects) are the results of the tool. The Square tool has two givens — two adjacent vertices of the square. The remaining vertices, the sides, and the square itself are the tool’s results. Think of the various objects and relationships that make up a tool as a family tree. In this family tree, the givens are the ultimate ancestors — objects that have children but no parents. The other objects — those that have parents — are the results of the tool. The Script View shows lists the givens and the results of the currently chosen custom tool. |
Tools can use as their givens various kinds of objects: points, straight objects, circles, measurements, functions, and so forth. When you use a tool, a message appears on Sketchpad’s status line at the bottom of the window describing what kind of given object you need to match next. (In Windows, the status line appears at the bottom-left of the window frame. On Mac, the status line appears at the bottom-right corner of the sketch.) For example, if a tool uses a point, a segment, and a distance measurement as its three givens, the status line first says “1. Match Point…” to indicate what object you must match first. After you match the point, the status line says “2. Match Segment…” to indicate that you must next specify a segment. And finally, it says “3. Match Distance Measurement…” when it’s time for you to click on a distance measurement as the last given object. You can always match a given by clicking a sketch object of the correct kind. For some givens — points, straight objects, circles, and polygons — you can also match the given by constructing it. If the Script View is showing, you can see its given objects highlighted as you match them. If a given object for a tool is a point, you can specify it in either of two ways. •To specify an existing point, click it in the sketch. The point you click on is used as the given. •To construct a new point, click somewhere else in the sketch — in empty space, on a path, or at an intersection. The point you construct is used as the given. If a given object for a tool is a circle, a straight object, or a polygon, you can specify it in either of two ways. •To specify an existing object of the correct kind, click it in the sketch. The object you click on is used as the given. •To construct a new object, click twice (or press and drag) in the sketch to construct a circle or straight object, or click at least three times for a polygon. If you’re constructing a circle given, the first point is the center and the second point is the radius point. If you’re constructing a straight object, the two points are the two determining points of the straight object. If you’re constructing a polygon, click each vertex and then click again on the first vertex to signal the end of the polygon. If the given for a tool is any other kind of object, you must click on a matching object in the sketch. If no object of the correct kind exists in the sketch, you must create such an object before you can use the tool. If a given tool object in the tool always matches the same sketch object, you can make this match occur automatically. |
Use any custom tool as a command by selecting appropriate objects as prerequisites and holding the Alt key (Windows) or |
See also: