Display Attributes |
  
|
| Show/Hide Hidden Text |
Display Attributes |
|
| Show/Hide Hidden Text |
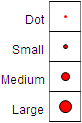
Point Styles |
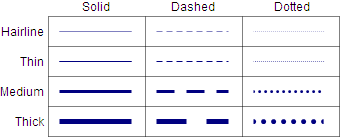
Line Styles |
There are several display attributes that many objects have in common. You can set most of these attributes using the Display menu, the Text Palette, or the Text tool.
You can also use the Context menu to change an object’s display attributes.
To set other properties of an object, select the object and choose Edit | Properties, or choose Properties from the Context menu.
Every object in Sketchpad can be colored. •Set an object’s color by selecting the object and choosing Display | Color. •Set the label color of an object by selecting it and using the Text Palette. •Set the text color of an object that shows only text by selecting the object and using either Display | Color or the Text Palette.
|
Most objects in Sketchpad can be labeled. •Show or hide an object’s label by clicking the object with the Text tool or by selecting the object and choosing Display | Show/Hide Label. •Change an object’s label by double-clicking the label with the Text tool or by selecting the object and choosing either Display | Label or Edit | Properties | Label. •Change the font, size, style or color of a label by selecting the object and using the Text Palette. |
Objects can be hidden from view, although such objects remain present in the sketch and continue to control or influence other objects. •Hide one or more objects by selecting the object(s) and choosing Display | Hide. •Show all hidden objects by choosing Display | Show All Hidden. •Show a single hidden object by selecting a related object, using Edit | Properties | Object to navigate to the desired object, and using its Object Properties to show it. •Make it easy to show or hide particular objects by creating a Hide/Show action button. |
Points and geometric objects based on points (including iterated images of points, discrete function plots, discrete point loci, and angle markers) can be displayed in four sizes: Dot, Small, Medium, and Large. To set the point style for selected objects, use the Display | Point Style submenu. When all selected objects share a common point style, a checkmark appears in the submenu next to that style.
|
|
Many geometric objects (including segments, rays, lines, circles, arcs, continuous point loci, continuous function plots, polygon frames, angle markers, and path tick marks) are displayed with straight or curved lines. The appearance of these lines is determined by the object’s line style. To set the line style for selected objects, use the Display | Line Style submenu and choose either a width (Hairline, Thin, Medium, Thick) or pattern (Solid, Dashed, Dotted). When all selected objects share a common line style, a checkmark appears in the submenu next to that style. If you construct a path coinciding with, or collinear to, a longer path (for example, when you construct an arc on the circumference of a circle, or when you construct a segment along a line), the longer path is automatically dashed to better display the shorter path coinciding with it.
|
Most objects that occupy a two-dimensional area (polygons, circle interiors, arc interiors, pictures, iterations and loci of these objects, and angle markers) can be made translucent, allowing similar objects below them to show through. To set the opacity of a translucent object on a scale from 10% (nearly transparent) to 100% (completely opaque), select the object and choose Edit | Properties | Opacity. (A completely transparent object would be invisible, so the only objects that can be set to 0% opacity are objects that have a visible frame or stroke such as framed polygons and angle markers.) |
Geometric objects and parameters can be animated so that they move or change of their own accord. •Start an animation by selecting one or more objects and either choosing Display | Animate or pressing the Motion Controller’s Start button. •Make it easy to move or animate particular objects by selecting them and creating an Animation or Movement action button. See also: |
Geometric objects can be traced. As they move they leave behind on the screen a trace showing where they’ve been. •Trace an object by selecting it and choosing Display | Trace. (The check mark next to the command will turn on.) •Stop tracing an already traced object by selecting it and choosing Display | Trace. (The check mark next to the command will turn off.) •Erase the collected traces from the screen by choosing Display | Erase Traces. •Determine whether — and how quickly — traces fade from the screen by choosing Edit | Preferences | Color. |